The King is Watching: Master Strategy Guide & Tactical Survival Manual

The King is Watching reimagines castle defense and resource management through a deceptive, high-stakes premise: your subjects only work when your royal gaze falls directly upon them. Set upon a constrained 5x5 grid, every wheat harvest, lumber cut, ingot smelt, and troop recruitment freezes the instant you look away. Success demands dynamic spatial awareness, strict production prioritization, and swift tactical pivots under relentless enemy siege.
This comprehensive guide delivers a step-by-step roadmap to conquer every phase of a run. From mastering gaze geometry and council synergies in the opening moments to building infinite production loops, countering late-game dragon assaults, and climbing maximum Threat Levels, this manual covers the essential systems needed to secure your realm.
1. Mastering Core Gaze Mechanics and Grid Geometry
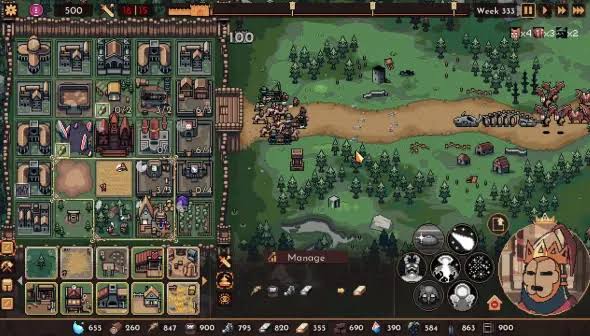
The foundational law of The King is Watching is that idle tiles produce nothing. Your Royal Gaze acts as a movable spotlight—controlled by dragging the left mouse button and rotated with the right mouse button—that activates a small cluster of adjacent squares. In the early game, your gaze covers only three tiles simultaneously. Leaving buildings outside this field halts their progress bars immediately, making static city-building layouts ineffective.
Optimizing your 5x5 grid requires organizing buildings by operational synergy rather than symmetry. Group complementary structures—such as a Wheat Field, Windmill, and Bakery, or an Iron Mine and Smeltery—into tight 3-tile clusters that match your current gaze footprint. This arrangement lets you activate an entire supply chain in a single sweep without wasting royal attention on unlinked tiles.
Maximizing Spatial Awareness and Vision Mobility Constantly moving your gaze is essential for success. Instead of parking your vision over one quadrant, develop a rhythmic scanning cycle across your board. Shift your gaze between primary extraction, secondary refining, and military training barracks to keep all timers advancing smoothly.
Gaze Priority Principles • Active Chokepoint Focus: Prioritize barracks and defensive weapon foundries when enemy waves cross the midline of the battlefield. • Instant-Action Rotation: Move your gaze off extraction nodes the moment their cycle completes to prevent production overflow waste. • Early Gaze Expansion: Prioritize run upgrades that expand your vision area from 3 tiles to 4 and 5 tiles to rapidly multiply overall economic output. • Shift-Hover Auditing: Hold the Shift key to inspect building production timers and depletion thresholds before redirecting your vision.
Upgrading the size and shape of your Royal Gaze is the most impactful run upgrade available. Expanding your vision area scales your kingdom's productivity exponentially, allowing simultaneous economic harvesting and continuous troop recruitment.
2. Selecting Monarchs and Council Advisor Synergies
Every run begins with choosing your Monarch and assembling your Royal Council. Your King dictates your fundamental macro tempo. King Baldwin functions as an economic engine, generating supplementary resources, accelerating tech curves, and providing a steady drip of bonus peasants to keep core structures operating efficiently. In contrast, King Leonid emphasizes military tempo, boosting troop maximum health and allowing full-board gaze activations with Wine.
Council Advisors provide passive benefits that define your strategic direction. You can appoint up to six advisors, combining early-game defense buffers with late-game production multipliers. Pairing an advisor who adds flat wall health with a Monarch who enhances base unit stats creates a safe buffer during early waves, allowing you to focus your attention entirely on the economy.
Evaluating Monarch Abilities and Playstyle Alignment Each King requires a distinct economic foundation. Baldwin thrives when expanding basic resource production and cycling building blueprints. Leonid demands early investments in Vineyards and Butcheries to fuel his board-wide activation abilities and maximize unit survivability.
High-Performing Council Advisor Combinations • The Fortified Expansionist: Julian combined with Wall Durability Advisors to safely absorb early wave damage while clearing junk tiles. • The Mercenary Guild: Free Starting Troop Advisors paired with Barracks Discount Advisors for rapid early-game army deployment. • The High Scholar: Spell Cooldown Reduction combined with Mana Well Regeneration to establish an active spell-slinging defense. • The Agrarian Tycoon: Crop Growth Speed paired with Market Fee Reductions to quickly generate large gold reserves.
Ensure your advisor choices support your chosen victory condition. Synergizing council buffs with your King's innate perks turns high-threat difficulty modifiers into manageable strategic challenges.
3. Early-Game Foundations: The Opening Ten Waves
The first ten waves determine the momentum of your entire run. You begin with limited infrastructure: a single Well, finite Wheat Fields, and small Tree clusters that permanently deplete once harvested. The central 5x5 board is also cluttered with rubble and debris that must be cleared to make room for permanent production lines.
A common early-game mistake is over-investing in military units before stabilizing your basic resource supply. Your castle walls possess a dedicated health pool designed to absorb damage. Intentionally letting weak early waves hit your fortifications saves hundreds of wood and food, which can then be reinvested into Tier 1 tech and gaze expansions.
Navigating Finite Resource Nodes and Board Clearing Exhaust finite starter tiles quickly and deliberately. Do not leave half-harvested resource nodes scattered across the grid; focus your gaze to deplete them, clear the rubble, and open contiguous space for permanent high-tier buildings.
Wave 1–10 Strategic Checklist • Deplete Initial Wells: Gather essential water supplies to start small wheat and timber cultivation immediately. • Clear Rubble Clusters: Cleanse central 3x3 tiles to make room for long-term production engines. • Rely on Base Defenders: Defeat early goblin scouts using starter peasants and your King's innate summons without building extra barracks. • Draft Blueprints Selectively: Pick permanent Sawmills, Deep Quarries, and Iron Mines over temporary resource packs.
By Wave 10, your starter debris should be cleared and your first permanent Sawmill and Wheat Field established. This economic foundation allows you to transition smoothly into advanced metalworking and military recruitment.
4. Mid-Game Scaling: Transitioning to Infinite Production Engines
Mid-game success hinges on replacing finite starter resources with infinite Tier 2 and Tier 3 structures. Standard Wheat Fields and surface trees quickly run dry. Securing blueprints for Large Wheat Fields, Deep Iron Mines, and Industrial Sawmills ensures an uninterrupted flow of materials for late-game armies and spell colleges.
Refining secondary resources introduces more complex logistics. Raw iron ore must be refined into Iron Ingots, and raw wheat must be ground into flour or brewed into beverages. Organize these multi-step supply lines in tight linear or triangular grid patterns so that a single gaze placement keeps the entire refining process active simultaneously.
Balancing Secondary Smelting and Refining Loops Avoid overproducing raw materials without sufficient processing capacity. An excess of iron ore provides no defensive value until smelted into weapons and armor. Balance your extraction and refining ratios to keep your storage balanced and your economy flexible.
Optimal Resource Ratios and Placement Rules • The Metalworking Triangle: Place 1 Deep Iron Mine adjacent to 2 Smelteries, allowing direct gaze coverage over raw mining and ingot casting. • The Agrarian Loop: Pair 1 Large Wheat Field with 1 Windmill and 1 Brewery or Bakery for steady morale and unit sustainment. • Strategic Demolition: Demolish depleted structures using the Demolish tool to recover building space. • Storage Cushioning: Maintain a reserve of 15–20 refined ingots and timber to instantly replace fallen military units between waves.
Once your infinite production loops are running, your economy can sustain itself automatically. This stability lets you shift your attention toward building a powerful standing army and casting offensive spells.
5. Army Roster Optimization and Barracks Deployment Control
Military forces in The King is Watching are split between units active on the battlefield and reserves held in reserve barracks. A key tactical mechanic is the deployment toggle found on the unit interface. Setting troop production to blue directs newly trained units into barracks reserves, while brown immediately deploys them to the front lines.
Building an effective army requires combining sturdy frontline anchors with high-damage ranged units and disruptive specialists. Relying solely on basic Militia results in heavy casualties against armored mid-game waves. Incorporating Ballistas, Beast Hunters, Assassins, and Goose Hydras creates a resilient defensive line capable of handling diverse threats.
Building Frontline Synergy and Ranged Firepower Your frontline exists to hold enemy units in place while backline artillery and spellcasters eliminate them. Keep heavy infantry in your barracks until enemy waves group up, then deploy them all at once to maximize your area-of-effect damage.
Top Army Compositions and Unit Builds • The Ballista Stun Battery: Combine 4 Foot Soldiers, 3 Beast Hunters, and 2 Ballistas to lock down high-health elite enemies. • The Goose Swarm: Deploy Geese and Goose Hydras for cost-effective, high-damage mid-to-late game scaling. • The Worm Rider Artillery: Stack 6–8 Worm Riders to deliver overlapping area-of-effect damage that can wipe out grouped enemy waves instantly. • The Assassin Strike Force: Use Assassins with damage upgrades to quickly eliminate dangerous backline enemy spellcasters.
Maintaining full reserve barracks is critical for surviving unexpected wave surges. If an elite assault breaks your frontline, releasing a stored reserve wave from your barracks stabilizes your defenses before the castle walls take damage.
6. Combat Timing, Wall Preservation, and Defensive Gaze Cycling
Managing your gaze during combat requires balancing offensive focus and domestic production. Fixating entirely on the battlefield halts your economy, cutting off the resources needed to replace falling troops. Successful defense relies on a disciplined gaze cycle between resource generation, troop training, and spellcasting.
Castle structures like Arenas, Concert Halls, and Hospitals provide powerful passive support during battles. High Morale boosts your army's attack speed and movement, while an active Hospital heals wounded soldiers between enemy waves, reducing the need to train replacements.
Coordinating Frontline Combat with Resource Upkeep When an enemy wave arrives, keep your gaze focused on the battlefield to support your units and trigger active skills. As the frontlines stabilize, rotate your vision back to your Smelteries and Barracks for a few seconds to queue reinforcements before returning to the fight.
The Three-Step Defensive Gaze Cycle • Step 1: Initial Engagement: Focus your gaze on your frontline units and defensive towers to trigger initial volley abilities. • Step 2: Economic Restock: Shift your gaze to your Sawmills, Smelteries, and Wheat Fields for 3–5 seconds to process resources and queue replacement troops. • Step 3: Arcane Support: Pan your gaze across Mage Colleges to generate mana and ready defensive spells for the next enemy push.
Mastering this gaze rhythm keeps your production lines running throughout long battles, ensuring your defenses remain supplied through high-density enemy waves.
7. Market Commerce, Artifact Hunting, and Spellcasting Supremacy
Gold is the most versatile resource in The King is Watching, functioning as the currency for purchasing artifacts, relics, and tech upgrades. Gold is generated through the Market building, which must be kept under your gaze while selecting surplus goods to sell. Exporting refined items like Iron Ingots and Wine yields substantially higher profits than selling raw wood or wheat.
Visiting merchants offer a rotating selection of artifacts, spells, and blueprints. As a general rule, prioritize buying game-altering Artifacts and powerful Spells over basic building blueprints, which can often be obtained as free rewards from winning battles.
Building Mana Engines and Tactical Spell Rotations Mage Colleges turn raw resources into mana for game-changing spells. Combining multiple Mage Colleges allows you to build a continuous spell engine, giving you access to battlefield freezes, damage boosts, and unit protection during difficult waves.
High-Impact Spells and Relic Priorities • Stun Relic (20-Hit Trigger): Stuns targets every 20 attacks, making it exceptionally strong against high-health bosses. • Invulnerability Ward: Grants temporary damage immunity to all friendly units, protecting your army against lethal enemy area-of-effect attacks. • Mass Freeze / Sheep Hex: Temporarily disables elite enemy units, allowing your ranged backline to pick them off safely. • Wrath of the Heavens: Deals heavy area-of-effect damage across the battlefield to clear clustered enemy swarms instantly.
Combining high gold income with powerful spellcasting creates a versatile defense that can adapt to bad blueprint RNG and overcome unexpected combat setbacks.
8. Wave Prophecy Selection and Risk-Reward Management
Between invasion waves, you are presented with Wave Prophecies—optional battle modifiers that increase the size or strength of upcoming enemy forces in exchange for rewards like blueprints, gold, and rare relics. Choosing the right prophecies accelerates your economic and military progression.
The key to managing prophecies is matching enemy wave types to your current defensive strengths. If your army features heavy area-of-effect damage from Worm Riders or Catapults, taking prophecies that add massive swarms of low-health goblins provides free bonus rewards, as your artillery can wipe them out instantly.
Reading Prophecy Affixes and Enemy Modifiers Avoid taking prophecies with elite enemy modifiers if your army lacks hard crowd control or defensive spells. High-damage, single-target bosses can tear through unfortified frontlines if you lack Stun Artifacts or Invulnerability wards.
Prophecy Selection Guidelines • Swarm Modifiers: Safe to choose when you have 6+ Worm Riders, Catapults, or high-level Fire Mages ready to deploy. • Elite Boss Modifiers: Take these only when you have single-target specialists like Beast Hunters, Ballistas, and Freeze spells. • Speed Buff Modifiers: Avoid these early in a run unless your castle walls have plenty of surplus health to absorb fast rushes. • Resource & Relic Rewards: Prioritize prophecies that award Meta-Crystals, high-tier Artifacts, or rare building blueprints.
Carefully evaluating risk versus reward allows you to farm bonus upgrades quickly without putting your castle walls in unnecessary danger.
9. Boss Encounters: Defeating the Golden Dragon and Elite Foes
The milestone boss encounter against the Golden Dragon tests every aspect of your kingdom's defenses. The Dragon features devastating area-of-effect fire sweeps, aerial strafing runs, and an enormous health pool that will outlast unoptimized armies.
Beating the Dragon requires precise spell timing and dedicated crowd control. Ranged Ballistas and Beast Hunters are essential for locking the boss in place with continuous stuns. When the Dragon takes flight to unleash its map-wide fire breath, cast an Invulnerability spell to protect your army from being wiped out.
Countering Boss Flight Phases and Area-of-Effect Attacks Bosses cannot be crowd-controlled while airborne, making damage mitigation spells your primary line of defense. Save your mana specifically for defensive shields rather than offensive spells during the Dragon's aerial phases.
Boss Encounter Battle Checklist • Pre-Boss Roster: Field at least 3 Beast Hunters and 2 Ballistas to maintain a reliable stun lock. • Spell Reserve: Keep at least one Invulnerability or Mass Freeze spell off cooldown before the boss appears. • Reserve Barracks: Stock full reinforcement waves in your barracks to replace fallen frontliners immediately. • Focused Gaze Lock: Keep your gaze centered on your primary damage units and Mage Colleges throughout the boss fight.
Defeating the Golden Dragon rewards you with top-tier relics and Meta-Crystals, providing the resources needed to prepare for the even greater challenges of endgame endless modes and higher Threat Levels.
10. Meta-Progression, Skill Trees, and Threat Level Mastery
Between runs, your collected Meta-Crystals are spent in the grand Castle Upgrade Tree. Permanent upgrades include expanded starting gaze shapes, increased baseline wall health, unlocked building blueprints, and new Council Advisor seats. Investing early crystals into base structural perks makes every subsequent run much easier.
Higher Threat Levels (scaling up to Threat Level 10 and beyond) introduce harsher modifiers, including reduced starting wall health, faster enemy waves, and tighter starting gaze restrictions. Surviving these high-difficulty runs requires tight, efficient economic setups and zero wasted gaze uptime.
Prioritizing Meta-Upgrades in the Skill Tree Focus your initial crystal spending on building upgrade blueprints, council seats, and general economic boosts before unlocking expensive alternative Kings. Unlocking powerful late-game units like Goose Hydras provides a much bigger immediate boost to your win rate.
Threat Level 10 Survival Strategy • Rush Gaze Expansions: Prioritize early-run gaze size upgrades to offset starting vision penalties. • Focus on High-Damage Units: Shift away from slow attrition builds in favor of high-damage units that eliminate threats quickly. • Trade Wall Durability Wisely: Use your wall health as a resource in early waves to gain an economic head start, but repair it before mid-game elite pushes. • Master Monarch Abilities: Time your King's active abilities carefully around difficult prophecy waves and boss encounters.
Mastering the relationship between permanent meta-perks, tight grid design, and steady gaze cycling allows you to conquer the highest Threat Levels and secure long-term victory in The King is Watching.
Success in The King is Watching comes down to efficient multitasking, smart spatial planning, and staying calm under pressure. By treating your Royal Gaze as an active resource, organizing your 5x5 grid around tight production loops, and balancing military strength with economic growth, your kingdom will thrive against any siege. Apply these tips, expand your gaze, and lead your realm to victory.
Master The King is Watching with this in-depth guide covering gaze mechanics, economy loops, army builds, dragon boss tactics, and high-threat meta-progression.